|
Applies to: vehicles with tyre repair kit

- Fig. 323 Components of the tyre repair kit
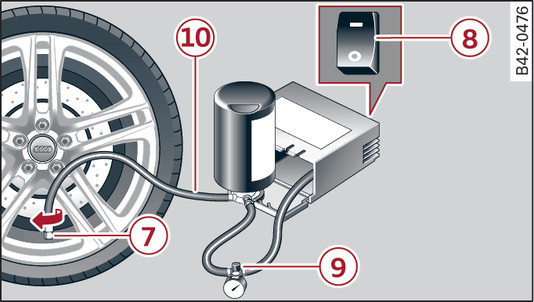
- Fig. 324 Connecting the tyre repair kit
Important: The tyre repair kit must be at hand and ready for use link►.
Setting up the tyre repair kit
Open the flap -2- on the compressor Fig. 323►.
Pull the connector -4- and the compressor hose -5- including the pressure gauge out of the housing.
Screw the compressor hose -5- onto the flange -6- of the tyre sealant can -1-.
Place the tyre sealant can (flange facing down) into the opening -3- on the flap of the compressor.
Unscrew the dust cap from the valve of the damaged tyre.
Screw the filler hose -10- onto the valve -7- Fig. 324►.
Insert the connector -4- Fig. 323► into a socket in the vehicle.
Switch on the ignition.
Inflating the tyre
Move the switch -8- Fig. 324► on the compressor to position I.
Pump the tyre up to 2.0 to 2.5 bar and monitor the pressure shown on the pressure gauge.
If the tyre pressure remains lower than the value specified above, remove the filler hose and drive 10 metres forwards or backwards at a low speed so that the sealant can spread evenly in the tyre. Now pump the tyre up again ►.
- Please observe the manufacturers safety notes on the compressor and the instructions supplied with the tyre sealant can.
- If it was not possible to build up a tyre pressure of 2.0 bar within 6 minutes this means that the tyre is too badly damaged. Do not drive on.
- Seek professional assistance if the repair of a tyre puncture is not possible with the sealing compound.
Note
Do not use the compressor for longer than 6 minutes at a time, as it could overheat. When the compressor has cooled down, you can use it again.